Often, new business owners hear about Xero, sign up for a subscription, but Xero just sits there, unused, because they’re not sure how to use it. Getting started with Xero can feel a little intimidating if you’ve never used accounting software before, but once you’re all set up, it’ll completely change the way you manage your business finances.
Here’s a simple step-by-step guide to getting set up and using Xero so you can start managing your books like a pro. Once you’re up and running, you’ll wonder how you ever managed without it.
1. Choose the right Xero plan
Head to xero.com/nz and take a look at the pricing plans. Xero offers several tiers depending on your business size and needs:
Ignite – Best for freelancers or sole traders. You can send up to 20 invoices and enter five bills per month.
Grow – The most popular option for small businesses that need more flexibility and unlimited transactions.
Comprehensive – Ideal for larger or more complex businesses, especially if you want to give access to additional users.
Ultimate - The Ultimate plan includes all Xero’s core accounting features plus tools for advanced analytics, employee management and multi-currency.
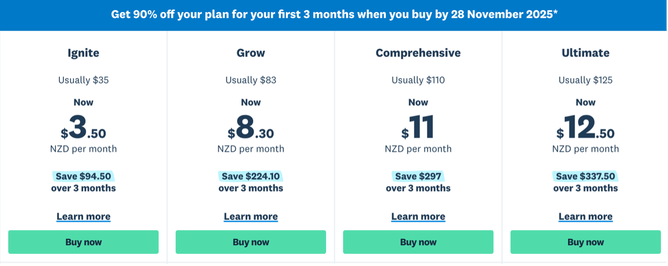
All plans include bank reconciliation, GST reporting, and an optional add-on for payroll. Once you’ve chosen a plan, click “Try Xero for free” and complete the signup form. You’ll receive a confirmation email prompting you to set your username and password. As a member of the Xero Partner Program, bookkeepers and accountants often get discounts for Xero subscriptions. Ask me about this.
2. Enter Your Organisation Details
After activating your subscription, Xero will walk you through its setup. The first step is to enter your organisation’s details. You’ll need to provide:
Your legal business name and trading name (if applicable)
Your NZBN (New Zealand Business Number)
Your organisation type (e.g., sole trader, partnership, company, or trust)
Your IRD number
Your business address and contact details
You can look up your NZBN at nzbn.govt.nz if you’re unsure or ask your bookkeeper for help.
3. Review your financial settings
Next, you’ll confirm your GST and financial year settings.
Check your GST accounting basis (cash or invoice).
Enter the date your financial year ends (most NZ businesses use 31 March).
Make sure the currency is set to NZD.
These settings ensure your reports and GST returns line up with IRD requirements.
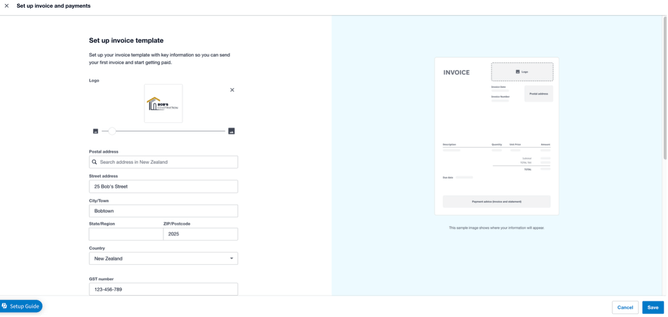
4. Customise your invoice branding
Your invoices represent your business — so it’s worth spending a few minutes getting them right. Within Xero, you can:
Upload your logo
Add your bank account details
Include payment instructions such as “Please use the invoice number as your payment reference”
These details will automatically appear on every invoice you send, making it easier for clients to pay you on time.
5. Add users
If you have a bookkeeper, accountant, or team members who need access to your accounts, you can invite them to your Xero file. Each user can have specific permission levels, for example, allowing your bookkeeper to handle bank reconciliation while your staff only manage invoicing.
6. Review your Chart of Accounts
Your Chart of Accounts is where all your transactions get categorised, things like income, expenses, assets, and liabilities.
Xero includes a default chart that suits most small New Zealand businesses. However, if you’re working with a bookkeeper or accountant, they may prefer to upload a customised version that matches your reporting needs. If you’re unsure, start with the Xero default.
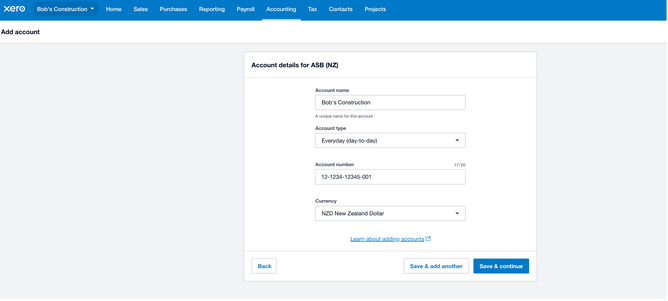
7. Add your bank accounts
Now it’s time to link your bank accounts. Add each account you use for business, such as:
Business transaction account
Savings or tax account
Credit card
Enter the account name, BSB (branch), and account number. You’ll see your accounts appear on the dashboard once they’re added.
8. Connect Your Bank Feeds
Xero’s bank feeds automatically pull your daily transactions straight from your bank into the software. Bank feeds are read-only, meaning they can’t move money; they just save you hours of manual entry. To set them up:
Go to the Bank Accounts section in Xero.
Click “Get bank feeds.”
Log in to your internet banking and follow the prompts to authorise Xero to import your transactions.
9. Choose a conversion date
If you’re switching from another accounting system, you’ll need to select a conversion date. This is the date by which you stop using the old system and start using Xero.
If your business is brand new, this date is simply when you start trading.
If you’re migrating from another software (like MYOB or QuickBooks), your accountant can help transfer your opening balances, outstanding invoices, and bills.
10. Final checks and next steps
Once these steps are complete, you’re now set up and ready to manage your business finances. From here, you can:
Add customer and supplier contacts
Customise your invoice templates
Set up payroll and employee profiles
Start reconciling your daily bank transactions
While Xero is designed to be user-friendly, it can still take a bit of practice to get used to. If you’d rather focus on running your business than your books, give me a call. I can review your setup, fix any errors, and make sure you’re compliant with IRD requirements.